Imagine you want to generate a PDF report or a word document from a Visualforce page. Use the renderAs attribute to generate the entire Visualforce page in a described format.
renderAs- This attribute is used to render the whole document in a PDF or any other document format.
Rendered- the return type for this attribute is a boolean which is used to hide or show any Visualforce component. It is always defaulted to true.
rerender- This attribute is used to refresh a particular section or a visual force code block.
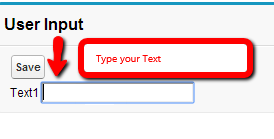
Here the user types in the first text box the block inside the apex output panel refreshes and displays the second text box and again if the user starts typing in the second text box the third text box appears. Refer these images below.
1:  <apex:page controller="renderedex" >
2:  <apex:form >
3:   <apex:pageBlock title="User Input" id="thePageBlock">
4:       <apex:outputText value="Text1"></apex:outputText>
5:       <apex:inputtext value="{!text1}">
6:       <apex:actionSupport reRender="refresh" event="onkeyup" />
7:       </apex:inputtext><br/>
8:        <apex:outputPanel id="refresh" >
9:                            <apex:pageblocksection rendered="{!LEN(text1)>0}">
10:                           <apex:inputText value="{!text2 }" id="theTextInput2" label="Input 2" rendered="true" tabindex="2">
11:                            <apex:actionSupport reRender="refresh1" event="onkeyup" />
12:                            </apex:inputtext>
13:                      </apex:pageblocksection>
14:        </apex:outputPanel>
15:        <apex:outputPanel id="refresh1" >
16:                            <apex:pageblocksection rendered="{!LEN(text2)>0}">
17:                            <apex:inputText value="{!text3 }" id="theTextInput3" label="Input 3" rendered="true" tabindex="3">
18:                            </apex:inputtext>
19:                            </apex:pageblocksection>
20:        </apex:outputPanel>
21:       </apex:pageBlock>
22:  </apex:form>
23:  </apex:page>


1 comment:
cleared my doubt about render and rerender. nice post.. keep up the work.. cheers!
Post a Comment